
How To Reset A Sump Pump – A Step by Step Guide
Sump pumps are essential for preserving your house from water leakage, cellar floods, and other financial difficulties. It might occur after a heavy thunderstorm or in a region where there is a lot of precipitation and flash floods are possible. Like other household equipment, Sump pumps require a resting period, and regular servicing will extend their lives.This guide will show you how to reset a sump pump.
Power shortages and power failures can sometimes cause sump pumps to malfunction if your apartment’s electricity goes out or your breaker trips. It’s wise to double-check that your submersible pump’s wiring component or battery reserve hasn’t burnt.
Suppose you require to reboot your submersible pump for maintenance. The procedure of rebooting a submersible pump system is rapid and straightforward. This is a step by step guide on how to reset a sump pump.
Read More About Resetting A Sump Pump…
Your submersible pump is responsible for transferring standing water from your cellar to the sewage system. Many pumps from well-known manufacturers, such as Zoeller, infrequently require restarting, although every pump occasionally requires servicing. It’s possible that your pump needs to get calibrated if it’s not performing as well as it did when it got first placed.
Perhaps your pump is running extremely slow than it used to, or you like to inspect the equipment after a heavy downpour, or you wish to restore it before a plumber comes to examine it and make repairs. If you become trapped or are unclear about progress, contact a skilled plumber for assistance. Let’s look at how to reset a sump pump.
How To Reset A Sump Pump – All You Need To Know
It’s simple to reboot your pump, and it only requires several minutes. Let’s review the stages of resetting your pump and clearing any dirt that could trigger it to malfunction and overflow.
Follow the steps below for How to reset a sump pump
-
Disconnect The Power
It’s critical to adopt all safety while dealing with electrical devices near liquid to prevent electrifying yourself or burning the apparatus. Therefore, before you do anything else, you must turn off the electricity. Power off the submersible pump by finding the connection and turning it off.
Then remove the submersible pump from its main supply, generally a wall connector. As an added measure, before detaching the submersible pump from its connection. Turn off the electricity to the submersible pump at your electricity breaker.
Note: Several versions include short reset controls that enable you to circulate the electricity and motor without removing the pump from the trench. These are useful for temporary solutions, but they do not necessarily cure mechanical issues.
-
Remove The Pump
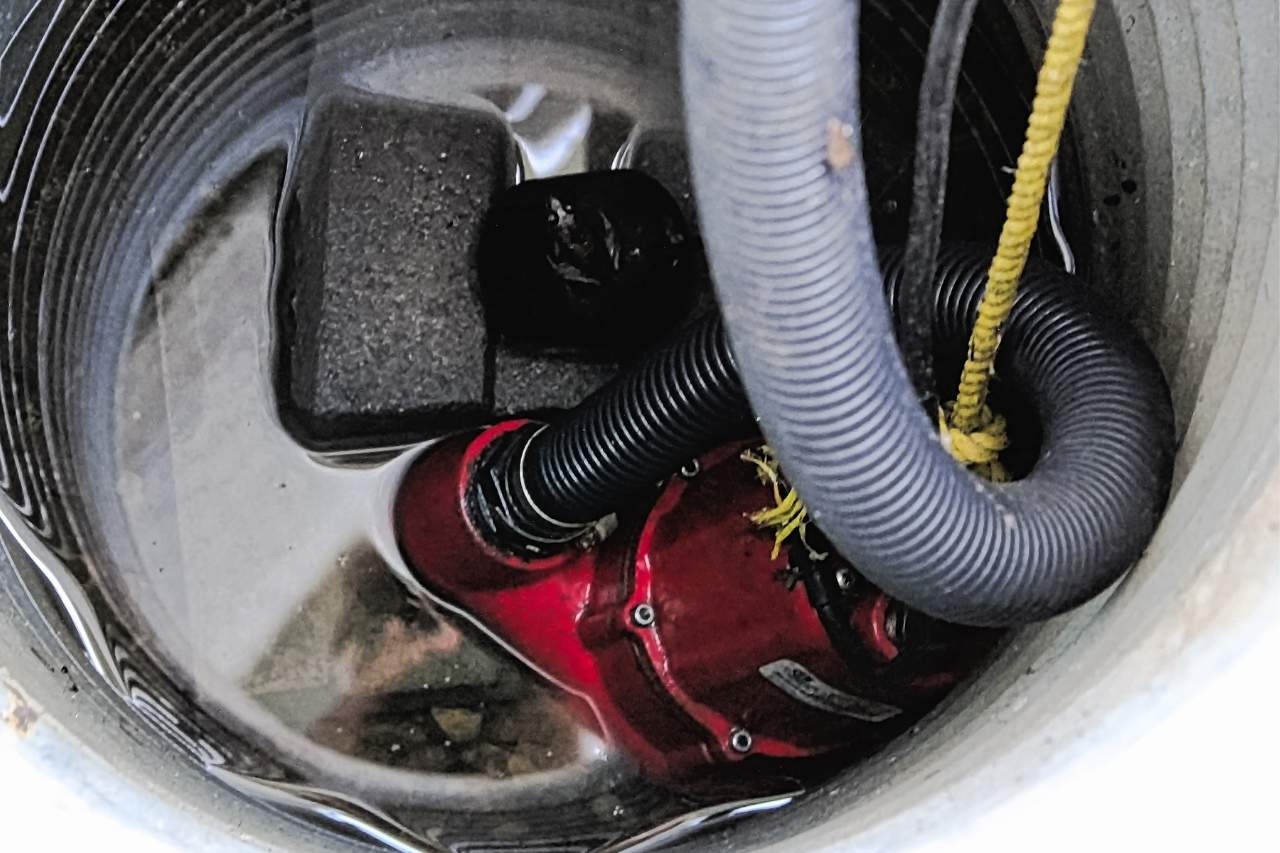
Your submersible pump gets installed in a sump pumping trench or basin. It would help if you detached the pump from the reservoir to examine its parts adequately once it gets turned off. Lift the basin covering and delicately pull the pump from the draining pit. Take care not to damage any pipes or pumping connections.
Please take photographs of the unit when it gets attached at this stage, so you have things to relate to whenever you fit it all in again. After removing the submersible pump from the pit, place it on an old handkerchief, sheet, or similar material. The pump would be unclean and might spill some water for a short time.
-
Clean Dirt
The motor becoming clogged or obstructed by tiny rocks, stones, mud, and residues that accumulate over time is among the most prevalent reasons for the malfunction of the submersible pump. As a result, clearing away the dirt may cure numerous problems and improve the life of your submersible pump.
If your submersible pump has a filtration system, wash it once a month. It’s wise to inspect the submersible pump’s outside for any corrosion stains or corrosion that might spill if the motor gets inundated.
Additionally, before reinstalling the pump in the aquifer, ensure that the drainage lines and discharging pipelines are smooth and devoid of blockages. Clogged sewers and release lines force your submersible pump to function more challenging than necessary, causing it to fume and create loud sounds
- Reconnect Everything
Replace the submersible pump in the basin and attach things the same way before. If necessary, refer to the photos you acquired in Stage 2 or perhaps the owner’s handbook. Ensure that equipment is correctly connected to prevent any potential spills. Ensure the floating switch goes up and down with the liquid content in the trench before moving on.
Return the on/off button to the on setting after plugging in the pump. If you additionally turned off the electricity at the circuit breaker, make sure you flip the switch on. Whether your submersible pump does not turn on, check to see if the power line or fuse panel got blown in operation. If this doesn’t work, your submersible pump may have a faulty motor or control.
-
Reset
If your submersible pump lacks a reboot button, removing it from its electrical supply would cycle the device’s motor as we performed in Stage 1. Now is the moment to utilize the reboot function on your submersible pump if it has one. Several submersible pump issues could get resolved purely by rebooting the pump.
If restarting equipment doesn’t solve your underlying matter, your submersible pump may have a more significant trouble. Most homes will have to bring in a certified plumber to check the problem before another thunderstorm to prevent a flooding cellar or other subterranean damages
Bottom Line
Power failures and spikes can cause submersible pumps to malfunction. Suppose your property goes offline during a thunderstorm or your circuit trips. In that case, it’s a wise practice to inspect your pump and ensure your power circuit doesn’t get damaged before another downpour.
You may use the button to reboot the unit by holding it there for 3-5 secs. The submersible pump gets frequently restored by doing so. Check to determine if it comes back on. If not, push the button once more.
Related : Cost To Upgrade To 200 Amp Service Electrical Panel
To read more articles like this : Visit HousingMind.com